


{Tutorial AND a GIVEAWAY – yea!}
 The snow has begun to fly around here and Christmas is on its way. Around our house, we do a whole lotta handmade for the holidays. My Two Peas and Sprout love, love, love going outside, so scarves seem to make perfect sense for one of my gift giving projects.
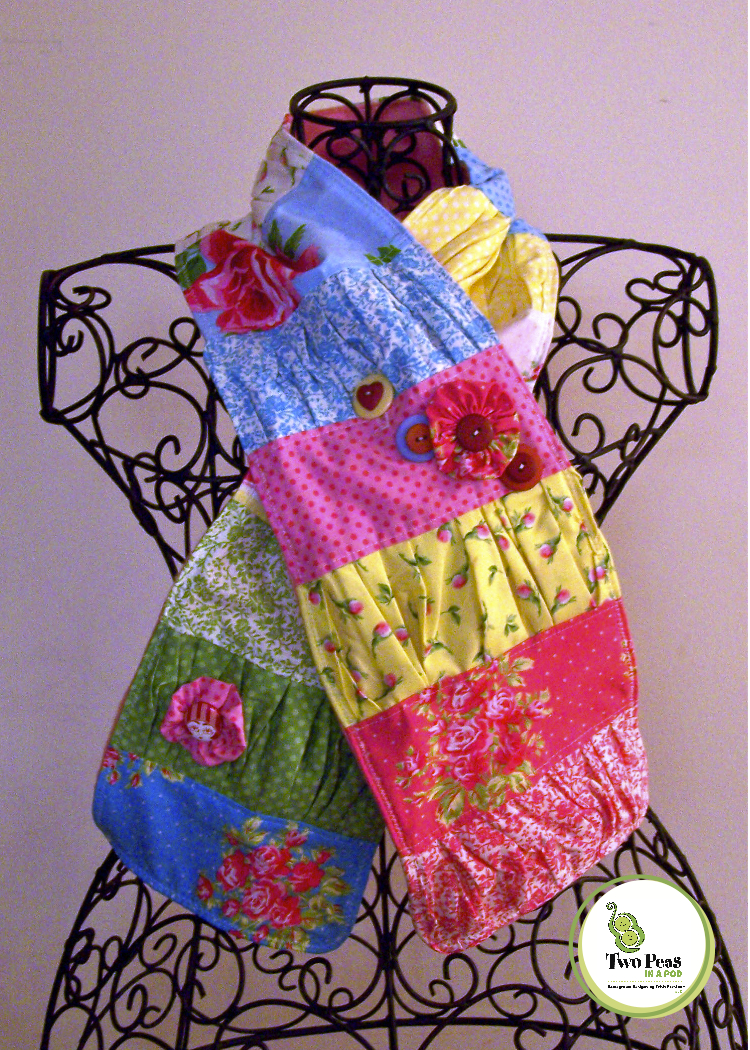
It’s a great way to use up your scraps and make something truly unique for a friend or a teacher or your little ones. The scarflette fits my Sprout just perfect and falls to her waist (she’s 2) but it also fits me just as perfect (at 44″ in length). Bonus.
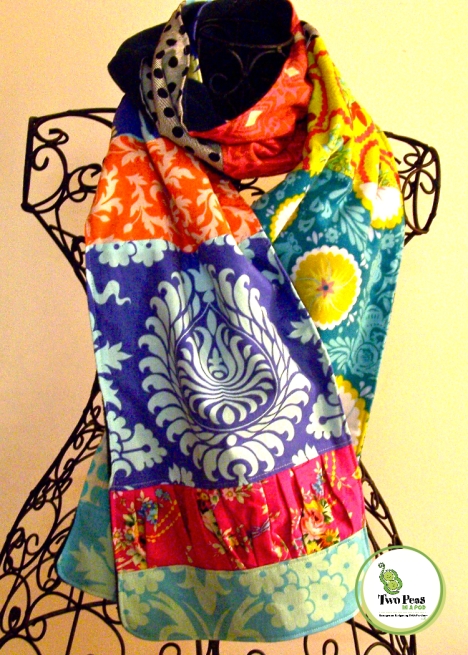
The scarf is BIG. It was like 20° here today so big warm scarves are a must.
With ruffles, some yo-yo’s and some fabulous buttons (thank you Hillcreek Designs) – I think the SCARF and SCARFLETTE are something you’ll enjoy making and giving.
I am lucky enough to count the lovely Elizabeth Scott as a friend and she shared some of her new fabric collection with me, Red Rose Farm which is what I used to make the scarflette for Sprout. Aren’t those fabrics so sweet?! {thank you so much Elizabeth for sharing!}
And since Elizabeth was so generous, I’d like to share some of her Red Rose Farm with you.
Leave a comment on this post and I will pick one winner to receive a precut kit of the Scarflette design as shown here that will include 16 pieces of Red Rose Farm and a stash of buttons from Hillcreek Designs and some pink fleece. Giveaway will end by December 9th at midnight. International friends welcome to enter.Giveaway is now closed.
 Let’s Sew!

Making the SCARF
Here’s whatcha need…
- Loads of scraps, I used a combination of cottons and flannel, Cut 10″ wide and totaling 80″ (includes seam allowance) in length (I like them a bit long for the way I choose to wrap it on but you may want to adjust this to your preference. The finished length is roughly 66″). On my scarf, I cut the two end pieces from the same fabric and the same size to match them up. I cut those pieces to be 10″ x 3 1/2″. And I added a ruffle above each end piece, cut 20″ x 3 1/2″.
- Lining fabric. The lazy girl method, just use your finished top as your pattern and cut your lining to size. I used a fleece. You could also use a flannel or if you live somewhere where it isn’t snowing, you could use cotton.
1) Lay out all of your scraps to plan the order in which you are going to piece them. Then, using 1/4″ seams, laying right sides together, piece your 10″ wide scraps to create your scarf top. On each end of my scarf, I created a ruffle and then added the final piece on each end which was identical print and size.
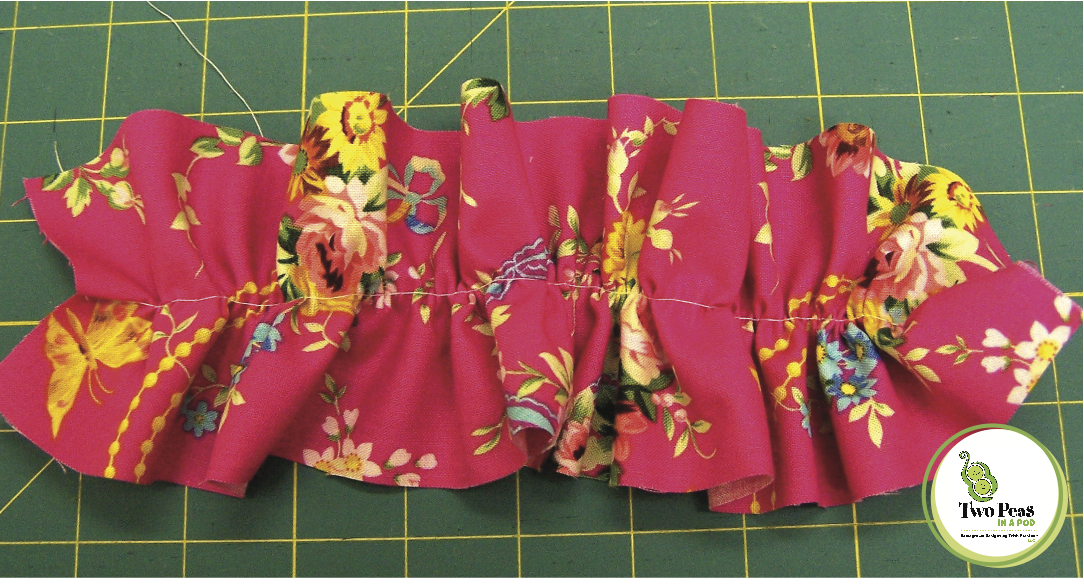

2) To create the ruffle, I used the piece cut 20″ x 3 1/2″. Run a gathering stitch down the center of that strip. Pin the ruffle to your fabric strip just allowing the ruffle to tuck and fold however it falls. Stitch. Then add on your last piece which on mine, was sized 10″ x 3 1/2″ and I used identical prints on the two ends.
3) Press ALL of your seams to one side and then topstitch. (see below). Remove your gathering stitch from your ruffles.

 4) Adding the lining. I suggest, you use your finished scarf top as your pattern and cut your lining fabric to size. With right sides facing, pin your lining fabric (fleece, flannel or cotton – your preference) to your scarf top. Using 1/2″ seams, stitch all the way around your scarf, beginning in the center on one of your long sides and leaving a 6″ opening for turning. Trim away excess and clip corners.
 5) Turn your scarf right side out. Press all along your edges to give it a crisp finish. Topstitch all along the edge of your scarf. Done!
the SCARFLETTE
 Materials
- Loads of scraps, my finished scarflette totaled 44″ – adjust as needed to fit for a custom fit. For the 44″ length, you’ll need 8 fabric strips cut 6 1/2″ wide x 3 1/2″. Cut 8 fabric strips 18″ x 3 1/2″.
- Use your finished scarflette top as a pattern to cut your lining fabric.
- Various buttons for decorative details.
- Fabric scraps for making yo-yo’s.
1) Lay out all of your fabrics to plan how you would like to piece them together. Then, gather each one of your long strips to create the ruffles.

2) To create the ruffle, run a gathering stitch down the center of each of your long strips. Pin the ruffle to your fabric strip just allowing the ruffle to tuck and fold however it falls. Stitch. Continue stitching together in the order of ruffle, flat piece, ruffle, flat piece and so on until your top is complete. (Refer to the ruffle photos above in the SCARF directions). Press all of your seams to one side and topstitch. Remove your gathering stitch from your ruffles.

3) Adding the lining. I suggest, you use your finished scarflette top as your pattern and cut your lining fabric to size. With right sides facing, pin your lining fabric (fleece, flannel or cotton – your preference) to your scarf top. Using 1/2″ seams, stitch all the way around your scarf, beginning in the center on one of your long sides and leaving a 6″ opening for turning. Trim away excess and clip corners.
 4) Turn your scarf right side out. Press all along your edges to give it a crisp finish. Topstitch all along the edge of your scarflette. On mine, I did my edge stitch using a zig zag stitch.
5) Adding the button(s). On our scarflette, we placed a button hole centered and up 11″ from the one end. (you should try on your scarflette and determine where you would like a button. This 11″ up fit both me AND my 2 year old so we could share!). Then I sewed a button on the opposite end to match the buttonhole. I layered several of the Hillcreek Design buttons for more color. I also made a couple of yo-yo’s and placed a button to the center. You could also opt to do two buttonholes – placed an 1 1/2″ from each edge for a bit more security if you’d like.

Check out my tutorials along the right hand side for a few more gift ideas. One that has been really popular and is easy and quick to make is the patchwork wristlets and lanyards. And a simple table runner is also a fun quick way to add some color to your holiday decor or even to make as a gift. My kids actually drew some pictures that we scanned and printed on that printable fabric you can buy at JoAnn’s and are planning on using that in a quilted table top. I also made a scarf like this last winter but it was narrower. I like both sizes but that post with the quickie text instructions for a narrower adult scarf can be found here
Happy Holiday Sewing! And don’t forget, leave a comment to be entered in the scarflette kit giveaway!
xoxo,
Trish
Filed under: sewing giveaway, sewing tutorial | Tagged: handmade christmas, handmade gifts, teacher handmade gifts | 69 Comments »
